

iOS 17: How to use standby feature to turn iPhone into a smart display
The 'Standby' feature of iPhone let's you turn your device into a smart display when it's locked and charging or even asleep.
Apple recently introduced the latest iOS 17 at it’s Apple Worldwide Developers Conference (WWDC 2023). It is expected to roll out to the supported iPhones sometime later this month after the iPhone 15 series launch event, which will be held on September 12.
The iOS 17 was introduced with some new and interesting features for the users. The ‘Standby’ feature is one of them. By using this feature, you can turn your iPhone into a smart display when it’s locked and charging. You can turn on the standby on your iPhone to view widgets, photos, and other information on the screen, when your device is charging or even asleep.
It will let you set different screens that will offer information that can be viewed at a distance.
You may think by turning on the standby mode, the notifications will stop coming. But, no this does not happen, you will keep seeing notifications on your iPhone when it’s in Standby mode. The incoming notifications will be shown full screen when you have your iPhone in StandBy mode.
Moreover, the Standby mode also supports Live Activities, which means it will show Live Activities for Messages, Music, and Maps. You can also use the Siri while the standby mode is on. The Live Activities and the answers to Siri queries will be shown in full screen.
All iPhone models that support iOS 17 have the StandBy mode, but the ability to use StandBy mode’s always-on feature is only available to iPhone 14 Pro models.
How to use/turn on Standby mode on iPhone
Step- 1: Check if your iPhone is running iOS 17 or not.
Step- 2: To turn on standby mode, you need to keep your iPhone locked and in stationary horizontal or landscape orientation on a MagSafe or Qi-based wireless charger or a Lightning charger.
Step- 3: Then Standby mode will turn on automatically. You can also turn it on manually by going to Settings > StandBy and toggle the switch on.
How to Customize the Standby screens
Once Standby is enabled, users are allowed to customize it in various ways. The StandBy has three screens that can be changed by swiping horizontally on the iPhone’s display while it is on Standby mode. The three screens let you put interactive widgets, individual photos from your Photos library, and a large clock.
Widget Screen
On the widgets screen, you can choose from a variety of widgets, including the clock, calendar, weather, music, and photos. There’s also a dual widget functionality. To use the dual widget, swipe left or right on the Standby screen. This will show you a different set of widgets. it will show two interactive widget stacks displayed side by side that you can swipe through up and down independently. You can drag and drop the widgets to rearrange them.
StandBy’s photos screen
It will display featured photos and memories from your photos library. You can also set specific themes including Nature, Pets, Cities, and People by a long press on the photo and Face ID unlock. Or you can use specific albums to be displayed using the + button, and hide themes that you don’t like using the eye icon. By tapping the location/date of the photo activates Face ID and then takes you to the image in your Photo Library.
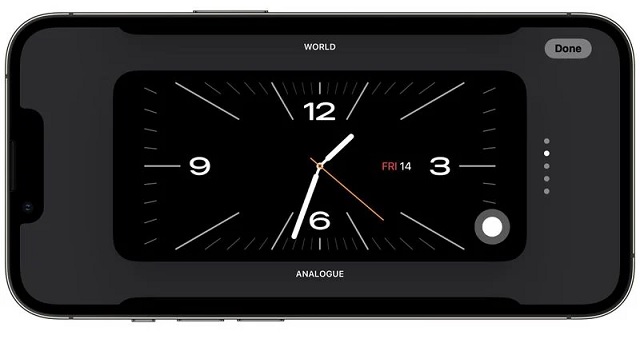
Standby Clock screen
It will show the time and date in various themes. You can swipe through them vertically. Some themes also show additional information like the temperature or your next alarm. If you press and hold on a clock, you can switch between different themes, which include Digital, Analogue, World, Solar, and Float.
You can disable Standby mode, by going to Settings > StandBy and toggle the switch off.
Note that the standby mode will only work when your iPhone is locked and charging. It should be in landscape orientation. You can’t use your iPhone for anything else while it’s in Standby mode.
